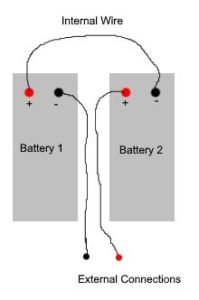
A CyberPower CP1500AVRLCD unit originally came with two batteries, B.B. Battery HR1234W with dimensions 6.00 x 2.60 x 3.70 in. (LxWxH). If you replaced them and forgot how to wire them back up, you can refer to the below diagram:
A CyberPower CP1500AVRLCD unit originally came with two batteries, B.B. Battery HR1234W with dimensions 6.00 x 2.60 x 3.70 in. (LxWxH). If you replaced them and forgot how to wire them back up, you can refer to the below diagram:
I had a CentOS 7 system running WordPress and received the warning: WordPress has detected that your site is running on an insecure version of PHP. The system was running PHP 5.6 which is end of life, so here are the steps I used to upgrade to the latest version recommended by WordPress at the time of this posting (PHP 7.3).
sudo yum install epel-release
yum install \
https://repo.ius.io/ius-release-el7.rpm \
https://dl.fedoraproject.org/pub/epel/epel-release-latest-7.noarch.rpm
For CentOS 6
yum install \
https://repo.ius.io/ius-release-el6.rpm \
https://dl.fedoraproject.org/pub/epel/epel-release-latest-6.noarch.rpm
Note: if you get Error: Nothing to do when using the above commends it means you may already have the repository installed and is safe to ignore.
yum install yum-plugin-replace
yum replace --replace-with php73-common php
Note: if you receive Error: Package ‘php’ is not installed then you are not on a stock install and you must replace php with the specific version you have installed. Inspect the output of the command:
yum list installed | grep php
Then perform the yum replace command using the package name you have installed. For example:
yum replace --replace-with php73-common php56u
Note: if you receive WARNING: Unable to resolve all providers it probably means identical replacements for all php extensions could not be found which is typical. Press y to continue.
apachectl restart
yum install php73-json
apachectl restart
Attempting to backup a Windows Server 2012 R2 Server with the Veeam Agent freshly installed and Backup and Replication server version 9.5 (also 10). The administrator credentials for the source server had been added to the destination server (Backup and Replication) and a backup job with type Windows Agent Backup was created. When running the job it would fail with error: Processing ServerName Error: Failed to connect to x.x.x.x:11731
The reason is because the source Windows Server was not properly added to the infrastructure of the destination Backup and Replication server. Checking the Programs and Features installed on the source Windows Server, only Veeam Agent for Microsoft Windows was listed. The Veeam Installer service was missing, which is triggered to install by the destination Backup and Replication server.
To resolve it, from Backup and Replication server navigate to Physical Infrastructure, Manually Added. Then perform a Rescan. Once complete you should see a confirmation that the Backup agent is installed on the source Server. Checking Programs and Features of the source Windows Server 2012 R2, the Veeam Installer Service should now be listed as installed. The backup job on the destination server can now be restarted and should complete without the previous failed to connect error.
Update 09-May-2020: The original script didn’t really work so I have commented it out.
Update 11-May-2020: Added method to search by Volume Name.
Update 23-Mar-2023: This also works for TrueNAS
Update 18-Aug-2025: Readded note 2 and link to official documentation
There are several reasons you may want to have ESXi rescan iSCSI at boot. For this example a FreeNAS guest VM was running an iSCSI target and sharing it back to the ESXi host. ESXi was then using it as a datastore with other VMs on it that also needed to be autostart. The trick is to start the FreeNAS guest and give it enough time to boot before letting ESXi proceed to the autostart step.
For troubleshooting, the script uses logger to send text to /var/log/syslog.log of the host.
This script should be added to the following file in ESXi (using vi) so that it is preserved by ESXi upon reboot:
/etc/rc.local.d/local.sh
Note 1: the last line of this file should be preserved (exit 0).
Note 2: This script will not be run when UEFI secure boot is enabled.
More information can be found on Broadcom’s support site:
https://knowledge.broadcom.com/external/article/324525/modifying-the-rclocal-or-localsh-file-in.html
#Establish our timer
count=0

#Power on the guest VM with the specified Vmid
#use the command vim-cmd vmsvc/getallvms to find which Vmid to use
vim-cmd vmsvc/power.on 1

#Now continuously rescan for the iSCSI device until it is found
#or the maximum time of 10 minutes is reached.
#This command will search all Logical Devices for one that has "Vendor_Name" in the Display Name (e.g., FreeNAS)
while ! esxcfg-scsidevs -c | grep -q 'Vendor_Name'

#Alternatively if you have multiple iSCSI targets that share the same Display Name
#(iSCSI Vendor) then you may want to instead search by Volume Name.
#This method allows you to single out a specific server since Volume Name is user configurable.
#The command below will search for the volume name 'Your_custom_volume_name' and that Mounted status is true.
#while ! esxcli storage filesystem list | grep -q "Your_custom_volume_name.*true"
do
    #print some debugging info to the syslog
    logger "local.sh: Forcing rescan since iSCSI target is not yet available..."

    #Rescan SCSI HBAs to search for new Devices, remove DEAD paths and update path state.
    #This operation will also run an claim operation equivalent to the claimrule run command and a filesystem rescan.
    esxcli storage core adapter rescan --all

    #Now wait (in seconds) before checking again
    sleep 30

    #Increase the timer
    count=`expr $count + 30`

    #Check if maximum time has been reached (in seconds)
    if [ $count -ge 600 ]
    then
       logger "local.sh: Aborting, maximum time reached while searching for iSCSI target."
       break
    fi
done

logger "local.sh: Search time for iSCSI target was" $count "seconds."

#-------------- Old script is below, do not use

#Adjust the delay in seconds as needed to allow time for NAS to boot up fully
#sleep 300

#Enable iSCSI Initiator and rescan for iSCSI specific LUNs.
#esxcfg-swiscsi -e
#esxcfg-swiscsi -s

#Search for new VMFS datastores. If a new datastore has been detected, it is mounted in /vmfs/volumes/
#vmkfstools -V

#another delay just to be sure
#sleep 10

#Run the ESXi autostart script again to start all VMs that are on the datastore
#sh /usr/sbin/vmware-autostart.sh start
BuddyPress @mentions were working perfectly within WordPress posts and comments however not in bbPress.
This is one solution to get @mention user lookups and an email notification when used in a topic or thread reply. However a notification is not logged within BuddyPress.
First create or modify the following file in your WordPress install
/wp-content/plugins/bp-custom.php
Sources:
https://codex.buddypress.org/themes/bp-custom-php/
https://gist.github.com/imath/5a3c4ac645ec765863f2
<?php
function custom_bbpress_maybe_load_mentions_scripts(
$retval = false ) {
if ( function_exists( 'bbpress' ) && is_bbpress() ) {
$retval = true;
}
return $retval;
}
add_filter( 'bp_activity_maybe_load_mentions_scripts', 'custom_bbpress_maybe_load_mentions_scripts' );
Then you will need to install the bbPress Toolkit plugin for WordPress.
Once activated navigate to Tools -> bbP Toolkit in WordPress Dashboard. Then choose Extras at the top and confirm mentions are enabled.
A second option is to use the bbp Mentions Suggest plugin available at this website:
http://www.rewweb.co.uk/download/bbp-mentions-suggest/
These are the minimum steps I needed to get WordPress running on Ubuntu Server 18.04. It is based on the below guide at the time of this writing:
https://wordpress.org/support/article/how-to-install-wordpress/#detailed-instructions
sudo cat /etc/mysql/debian.cnf
mysql -u debian-sys-maint -p(copy/paste the password from the previous cat output)
CREATE USER 'username'@'localhost' IDENTIFIED BY 'password'; CREATE DATABASE your_dbname DEFAULT CHARACTER SET utf8 COLLATE utf8_unicode_ci; GRANT ALL PRIVILEGES ON your_dbname.* TO 'username'@'localhost'; FLUSH PRIVILEGES; quit;
Specific setup was Windows Server 2012 R2 and UniFi Controller 5.12.35. The issue was that suddenly neither internal connections (LAN/private) nor external WAN (public/WAN) connections could access the controller. If Windows Firewall is enabled, the UniFi controller needs two apps allowed: UniFi DB Server and Java.
UniFi DB Server default location is
C:\Users\xxxx\Ubiquiti UniFi\bin\mongod.exe
where xxxx is the username
Java (32-bit) default location is
C:\Program Files (x86)\Java\jrex.x.x.x_xxx\bin\java.exe
where jrex.x.x.x_xxx is the folder name. This folder path changes depending on the version number of Java Runtime Environment installed.
The root cause was that Java was updated on the system but a new rule was not automatically created for it in Windows firewall. Upon inspection there were several rules for Java already present in the firewall but none were for the most recent version.
To check, navigate to Control Panel – Windows Firewall then choose the option for Allow an app or feature through Windows Firewall.
Find Java and then click the Details button. Here you can check if the path to java.exe matches the version that is installed. You can manually add the new version by using the Allow another app button.
Once allowed check to see if the controller can be accessed again.
These are the steps to crossflash a Dell 0WFN6R (SAS9341-8i) to an LSI 9300-8i. At the time of this guide the latest firmware available is P16.
All files needed for this guide can be downloaded here. The firmware and BIOS files were sourced directly from Broadcom’s website (Installer_P16_for_UEFI.zip and 9300_8i_Package_P16_IR_IT_FW_BIOS_for_MSDOS_Windows.zip specifically).
For UEFI method you will use sas3flash.efi. You can perform this same procedure with BIOS method by instead using sas3flsh.exe. However if in BIOS mode you receive ERROR: Failed to initialize PAL. Exiting Program, then you must switch to the UEFI method.
sas3flash.efi -list
sas3flash.efi -noreset -f SAS9300_8i_IT.bin
sas3flash.efi -o -e 6
sas3flash.efi -f SAS9300_8i_IT.bin
sas3flash.efi -b mptsas3.rom
sas3flash.efi -b mpt3x64.rom
sas3flsh.exe -o -sasadd XXXXXXX
sas3flsh.exe -o -assem XXXXXXX
sas3flash.efi -list
Recent experience with an Aquantia AQtion AQC108 5G network card that was integrated in a motherboard (Supermicro X11SRA-F). Plugging in an ethernet cable would not activate the port (status LEDs would not light up on either the NIC or the switch), so the NIC appeared dead. However when booting into ESXi 6.7 the NIC would be detected as AQC108 NBase-T/IEEE 802.3bz Ethernet Controller [AQtion] but not be listed under Networking – Physical NICs indicating that no driver was found. Turns out this NIC needs an OS that has a driver installed before the LEDs will activate. For example with the ESXi host machine the NIC was set up as Passthrough to a guest running Windows Server 2019 (which has the drivers built in). The link LEDs then began working and the NIC functioned normally in the Windows guest.
Upgraded a Supermicro CSE-836 from 3 pin fans to 4 pin PWM fans. Here is the before and after matrix of part numbers:
| Before | |
| Middle Fans (Qty 3) | FAN-0070L 672042003884 San Ace 80 9G0812G103 |
| Rear Exhaust Fans (Qty 2) | FAN-0062L 672042003839 San Ace 80 109p0812c2041 |
| After | |
| Middle Fans (Qty 3) | FAN-0094L4 672042020317 San Ace 80 9G0812P1G09 |
| Rear Exhaust Fans (Qty 2) | FAN-0062L4 672042023684 San Ace 80 109P0812P2C031 |
| Hot swap cables 4 pin to 4 pin (Qty 5) | CBL-0088L |
Note: the above matrix was for replacements in kind. The latest CSE-836 has these fans:
Middle: FAN-0126L4 (Qty 3)
Rear: FAN-0125L4 (Qty 2)
Note: an alternative 4 pin hot swap cable is CBL-0216L